How to Correctly Use Static Measuring Instruments
Are you measuring static correctly?
Correctly measuring static electricity is crucial for taking optimal anti-static measures.
Static measuring instruments are special devices of the non-contact type, so please use them with an understanding of the correct methods of use. Measuring instruments from Shishido Electrostatic have the feature of being very easy to use, thus enabling anyone to accurately measure static electricity.
Principle of static measurement
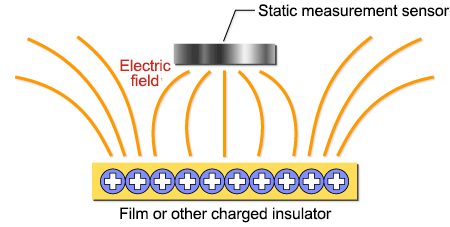
When an object is charged, the static electricity produces an electrical field.
The electric field due to static is detected by a sensor, converted to static electricity voltage, and then displayed. It is possible in this way to measure static electricity without contact. There are two types of sensors: the tuning fork oscillation type and the rotation sector type. (Production of rotary sector type instruments has been discontinued.)

Situation of static measurement
Types and features of static measuring instruments
| Model name | Features |
|---|---|
| DZ4 | 10V resolution, can measure up to a maximum of 19.99 KV Measurement distance 30 mm Equipped with 180-degree swivel mechanism Enables ion balance measurement (optional) Enables measurement of charge on human body (optional) |
| DSF601/W | Measurement range can be selected at the time of purchase between the A type (1 V to 1.999 kV) or B type (0.01 kV to 19.99 kV). The W type with WiFi communication feature can also be selected. Cable length of the compact sensor can be selected at the time of purchase up to a maximum of 10 m, and this enables measurement suited to the use situation. |
| Model name | Features |
|---|---|
| DP | Enables measurement of ionizer static elimination performance and ion balance. 1V resolution, can measure up to maximum of 1999 V. Measurement time 0.0–99.9 sec Equipped with 180-degree swivel mechanism (holds in place at each 45-degree angle) Plate dimensions 70×32 mm |
| CPM301 | +/- decay testing, ion balance measurement testing Conforms to ESD ANSI/ESD STM3.1 standard Enables data capture and control via a personal computer using optional application software. |
| STATIC HONESTMETER H-0110-S4 |
Suitable for investigating diffusibility of static in materials. Please use in combination with the V2-S1. Enables measurement of decay data with a personal computer. |
Principles and precautions for static measurement
- 1Precautions regarding grounding
- Grounding of measuring instruments is essential for accurate measurement. This is because the charge on the human body has an effect on measurement. Measurement can be done without a ground wire if it can be confirmed that the body has no charge, or if precise measurement is not necessary. When a person walks around, or moves in other ways, it is very bothersome but necessary to use ground wires for accurate measurement of body charge in settings such as semiconductor factories.
- 2If voltage of the object to be measured is unknown
- If voltage of the object to be measured is unknown, please approach slowly from a distance. Stop measurement if it appears that the range will be exceeded while still outside the prescribed measurement range. Sensor damage may occur. In addition, if you ignore warning signs and continue to approach, there may be a discharge phenomenon, even within about 50 mm, resulting in shock and malfunction of the instrument. The voltage of an object exceeding the range can be measured while correcting, to a certain extent, by increasing distance, but generally speaking an instrument should never be used for measurement exceeding its range.
- 3Measurement distance
- Measurement distance for the DZ4 is 30 mm. The distance can almost be determined by the focal point of the light, so please measure while always paying attention to the light.
- 4Impact
- The tuning fork sensor of a static measuring instrument is delicately made. It is vulnerable to impact and other shocks, and the sensor may malfunction if it is dropped, placed roughly on a desk, or struck.
- 5Humidity
- Among static measuring instruments, the HONESTMETER, CHARGED PLATE MONITOR, DX, and DP used to measure decay may not measure properly due to the spontaneous start of decay when humidity is high. When this happens, either wait until dry, or dry the instrument. Raising the temperature is an effective way to dry, but be careful because raising the temperature too high may cause device malfunction. With a CHARGED PLATE MONITOR, the effects of humidity can be reduced by drying the plate legs (four white legs) with hot air.
- 6Causes of measurement error
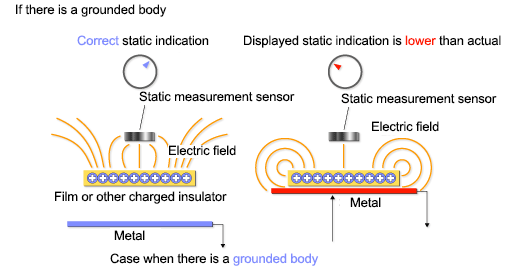
- If there is a grounded body or the like near the measured object, accurate measurement will be impossible due to the disturbance of the electric field.
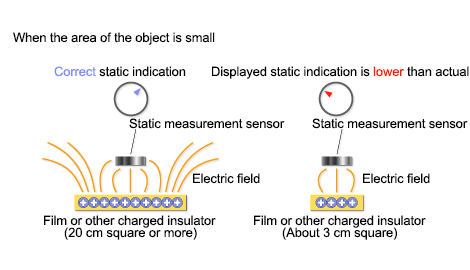
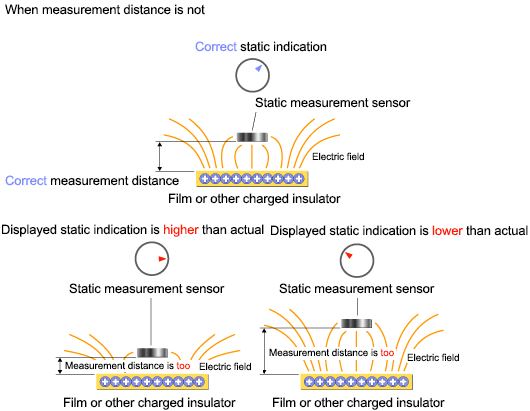
Also, instruments have been calibrated using a 200 mm x 200 mm reference tool called a calibration plate, and therefore correction is necessary when the measured object has a different size. Particular caution is needed with small objects because they produce a large measurement error. Measurement distance is determined for each instrument, and measurement error will result if the correct distance is not observed.

If there is a grounded body nearby

When the area of the object is small

When measurement distance is not correct
To ensure safety
To ensure safety, do not use measuring instruments in explosion-proof environments.
Shishido Electrostatic instruments are not certified as explosion-proof. When using instruments with a rotating mechanism like the turntable sample stand of the HONESTMETER, do not touch during rotation as this is dangerous. With the H0110-S4 and subsequent models, the HONESTMETER comes standard with a safety cover to prevent danger.
Non-static measuring instruments
For resistance measurement, we offer the MEG101 and SHOE TESTER II, and for decay measurement, we offer the HONESTMETER, CPM301, and DP. The MEG101 is used to measure the surface resistance value of the floor. Surface resistance of resin materials and other objects can be measured by changing the probe. The SHOE TESTER II is used for management of conductive shoes on coating lines and in similar settings. The HONESTMETER is used for measuring charge decay of resin materials, cloth, and the like. DP and CPM301 are used to check the static elimination effect of ionizers.
Calibration
At Shishido Electrostatic, we perform calibration once a year of equipment such as the high-voltage power supply used for calibration of measuring instruments, and for a fee we can issue a national standard traceability certificate (with calibration and test record). We do not support ISO/IED 17025 certified calibration such as JCSS calibration or A2LA calibration.
→「Sample traceability certificate」
We can also issue the calibration and test record only (for a fee)
→「Sample calibration and test record」
When you need calibration, please make a request to our company's Sales Division via the dealer where your equipment was purchased. Calibration cannot be done by the customer. For the HONESTMETER, there is a calibration tool, and simple calibration can be performed by the user, but handling is extremely difficult and dangerous, and precision measuring instruments are needed. For these and other reasons, we currently carry out calibration by having the customer return their equipment to our factory. Calibration generally takes about 2 weeks, but in July and August we calibrate in-house equipment, so please be aware that the delivery period may be longer at that time.
Calibration times
From the standpoint of ISO management, calibration times for measuring instruments must be determined by taking into account factors such as the use frequency of the instrument. Please determine the proper time by consulting with our control department. Generally speaking, calibration is performed once a 1 year in many cases.
![Real ESD Solutions & Ionizer [SHISHIDO ELECTROSTATIC, LTD.]](/img/logo-en.png)
![Real ESD Solutions & Ionizer [SHISHIDO ELECTROSTATIC, LTD.]](/img/logo_fixed-en.png)